18 April 2013

Pink and Yellow Colour Crush Reveal

Its my eldest daughters 7th Birthday today and if you've been following you will know that today is the day she is "Retiring" George and we also decided to surprise her with a room reveal of her very own when she got home from school this afternoon.

This was her reaction...


Before breaking into dance....


and then realising she had a huge jar of Rhubarb and Custard Bonbons sitting on the table beside her bed...


and this is what she was looking at...


Please excuse the crumpled quilt cover and pillow cases my iron was no match for those creases. I want to find or make one more yellow throw cushion for her bed.


I was originally going to go with a more fuchsia pink, however the samples I did were only pretty in certain light and this one was pretty in every light. It's called Sweet Caress by British Paints and it's oh so girly.


I've pinned a lot of these wood panel and barn wood headboards on my Pinterest account so I decided to have a go at making one... well my husband made it to my specifications because he doesn't trust me with a jigsaw. I'm really happy with the way it turned out, you can just make out the yellow I painted on the edges (I'll need to post a better photo of that detail at some point). It kinda equates to my contrast piping obsession I have at the moment don't you think?


I really love the soft texture of the Bamileke Juju hat but as I don't think I would be able to explain spending between $200 - $400 on a hat you hang on the wall to my husband, I thought I'd have a go at making a feathery artwork myself approximately $25 later my daughter now has this lovely piece hanging above her bed.


I want to paint her bedside table but I'm still not sure whether to paint it yellow, white or pink. I saw an image somewhere that had a pink table in front of a pink wall and it looked amazing but the yellow would be a great statement against the pink wall and white is timeless and well.... I do tend to want to change things up a fair bit.
So please let me know your opinions on what colour I should paint her bedside table.

My sister made up her Yellow and White Chevron Birthday print for her, and I've had that flamingo for quite some time holding her necklaces.

I haven't quite finished her room yet as you may have noticed from the mess behind her when she was dancing. I have her desk out on the entertainment area ready to prep for painting and a few little bits and pieces to find but it's certainly on it's way.

Finally my Pink and Yellow Colour Crush and my little Flamingo obsession is being satisfied and I'm extremely grateful that my daughter love love loves her new room.

Love Jade xx


5 April 2013

Meet George

George is a Monkey.

He is my eldest daughters comfort toy. She chose him as her 1st birthday present and he has been her constant companion ever since.

We both decided that George will need to retire soon. He's missing one ear and the other one is chewed his seams are coming undone and well to put it nicely he is looking rather dishevelled.
Radha has decided that she wants to put him up in her keepsake box along with her other 'valuables' First shoes, 1st tooth, 1st haircut...we don't want him to fall apart completely, so up he will go when she turns 7.

I decided to do a sketch and watercolour of him to frame for her room, so she will still be able to see him every day.

George is so handsome in his Top hat and Bow tie

As I watched George Clooney at the Oscars, looking very handsome in his suit and bow tie I thought "Our George is just like George Clooney, a dapper gentleman who's a little bit cheeky" I always pictured him in a Top hat and Bow tie, so he got them.

Radha would love another George but this time she thinks she will get a pink Monkey and call 'her' Georgina Rosy. He he I love the way kids think don't you?!

I'm very fond of George myself. I think he represents my daughter very well.
George is long and thin with long skinny arms and legs, he is cute, blonde and a little scruffy with a cheeky little smile.

I chose him as part of my Blog name because he also represents one part of my interiors style well too. Classic, timeless, casual sophistication with a sense of humour.

We're both looking forward to putting him up on her bedroom wall.

Love Jade xx
and Radha and George

25 March 2013

5th Birthday Party. Part 2 - Party Food

After the fun of sorting out the decorations was just about done I had a slight panic attack when I realised that the only party food I had planned was the adorable Marshmallow Mushrooms.
It was the week before and undoubtedly I would have a whole lot of baking and preparation ahead of me, knowing me and how I always tend to put that little bit much more pressure on myself than is entirely necessary.

The children were beaming after seeing the Party table, exactly the reaction I wanted
So it was time to focus on the party food, Fairy, Enchanted Forest inspired party food.

Here is the menu I came up with.

Butterfly Sandwiches
Chicken sandwiches cut out with a Butterfly shaped cookie cutter

Hubby and my dad were very helpful cutting out and assembling
these an hour or so before our little guests arrived
Gnome made Mini Quiche
 Self explanatory really except Gnomes didn't make them and neither did I
Enchanted Tree Trunks
Mini sausage rolls
Fairy Fruit Salad
Yummy brightly coloured healthy fruit salad

Fruit salad is just so pretty in these polka dot cups
Fairy Wands
Wafer sticks dipped in chocolate and coated in silver petit dragees
Little Fairy Wands and a Wicker garden pot plate nursing a
big jar of Pink Smarties, a necessity for the Birthday girl
Twigs
Pretzel sticks
Lollipop Trees
Green and white lollipops planted in little pots of sugar

Lollipop Topiary Trees

Pink Smarties
My daughter LOVES Smarties, they're her favourite sweet
Mushrooms WOW
Marshmallows dipped in red coloured white chocolate on top of another marshmallow
The adorable Marshmallow Mushrooms that inspired the Theme
Birds Nests WOW
Chocolate spiders shaped into a nest and topped with candy coated eggs

Birds Nests and Twigs All the food was presented on pink, green or wooden dishes
Acorns WOW
Cake balls dipped in chocolate coated in sprinkles and topped with half a pretzel stick

Acorn Cake balls Aren't they adorable as well
Mushroom Birthday Cake WOW

I still need a bit more practice using Fondant but yes
the Mushroom is meant to be tilting slightly ha ha 
I'd love to be able to claim that the WOW foods came straight from my creative little mind but they didn't. I can't exactly tell you who came up with these little gems as once you start looking you will find variations of each.

I'm definitely one of those mothers who believes that you should make your children's childhood magic, encourage creativity and imagination.
I wanted our little to guests to walk in and have a feast for their eyes as well as their tummies and the WOW reaction is exactly what I got. Their eyes lit up and their smiles went from ear to ear.

One very happy Birthday Girl
Even if the party games ended up in tears and tantrums I was content with the initial reaction I got when they saw the party table. 


Thankfully the Party games went off without a hitch.

The Games
1.  On arrival the children coloured in their own Gnome, until all the guests arrived.
2.  They played Stick the Gnome in his Home. Like Pin the tail on the Donkey, except they used the Gnome they coloured in and they had to put him in the doorway of his Mushroom House.
3.  They Decorated Wands to take home.
4.  Played Musical Mushrooms. I had printed out large Mushrooms, they danced around these then had to stand on them when the music stopped.

One of the little boys came dressed as a Fox so instead of What's the time Mr Wolf? they took it upon themselves to play What's the time Mr Fox?

It was delight to see their little imaginations at work.

All in all I can say that all the hard work and effort payed off and the day was a complete success.


My hope is that I managed to inspire someone to bring a little more magic into their child's life.


Love Jade xx 


22 March 2013

5th Birthday Party. Part 1 - The Theme

I began writing about my daughters recent 5th birthday party. With all the details on the event it became quite an essay so I've decided to break it down into a few parts.

I'll start with the theme because well dreaming about how it would look, setting it up on the day and seeing it all come together was and is my favourite part of this and every project.

This was to be her first little friends party, so we set to work trying to come up with a theme.
She wanted to be a fairy of course, what little girl doesn't want to be a fairy princess, but she also wanted to invite boys to her party. So we were faced with the dilemma of working out a theme where she could dress up as the little fairy she wanted to be, and also keep the boys happy by making sure the party wasn't over the top pink and girly.


Fairy Princess Birthday Girl

I began researching 'fairy' party food, (in my day it was fairy bread and cheerios with sauce) in the hopes I would find some inspiration.
I came across some adorable Marshmallow Mushrooms, and I just had to use these for her party, not only are they super cute, they are ridiculously easy to make and the kids would LOVE them plus they'd be high impact for little $ and effort.

Super cute and super easy

Mushrooms = Forest. Fairies live in a forest! What else lives in forests?... Gnomes, Elves, Bunnies, Foxes, Butterflies and Bugs... all sorts of wonderful creatures that little boys would be more than happy to dress up as. Obviously it couldn't just be any old forest if it has Fairies and Gnomes living there, it had to be.... an Enchanted Forest! Yay we had our theme.

The Enchanted Forest table
Now that we had the theme, the fun part began as I started having restless nights dreaming about the way my... errr her party would look. Oh how I love this part.
I was up and down many a night, unable to sleep soundly until all my ideas were sketched out on paper and lists were made.
They included falling leaves and lollipop trees, tree slices and stumps, bunnies, (as you know I'm a bunny girl) butterflies and mushrooms, pink, green and a splash of red.

It was time for me to stop daydreaming because time was running out and the invitations needed to get out before I could do anything else.
Enter my sister... "Please please please can you do an invitation for my.... ahhhh your nieces birthday party, oh and I need them in two days, I'll email you with some of my ideas"
After a few revisions on my part (sorry sis you were very patient) this is what she came up with.

Pink, girly and Enchanted Foresty enough?!
Now to source everything I was after... this is tricky for me because when I get an image in my head, then that is exactly what I want. Quite often I'll go without something rather than compromise on something similar. (This is usually because I have expensive tastes and what I want is wayyyy out of my budget)
Some things had to be created, yup typical me likes to add more work to her plate in order to get that vision just right.
Like my leaf garlands, I had a vision of falling leaves that I just couldn't let go of.

Falling leaves and butterfly covered lanterns.
Over 200 hand cut leaves sewn together by one dedicated mummy. My friends thought I was crazy, and my husband sat patiently beside me as I cut them out each night.

My friends husband dragged some tree logs up from the back of their property so that my husband could cut up my tree slices and stumps I also just had to have. I have amazing friends with amazing partners. Thank you Jo and Craig.

See how important those tree slices and stumps were,
they made a feature of the 'WOW' food

Now that the leaf garlands and butterfly lanterns were made and the lollipop trees on their way I only had to make the  food labels (enter my sister again, gosh she's a good Aunty) and Sorayas birthday sign. I was so happy with how Sorayas sign turned out that I'm trying to work out where I can hang it in her room.

I really wanted pink or white lids for the water. I couldn't find them when I wanted them
but of course the week after the party... no problem typical isn't it
I was thrilled with how her sign came out, I wanted it to look like large scrabble tiles
I'm a details girl, note the 5 in the bottom corner of each letter
With everything sourced and on its way or created all I had to do was start planning the rest of the party food, remember at this stage all I have in mind is the Marshmallow Mushrooms that started this whole thing.
The party food will be part 2 of Sorayas 5th Birthday Party.

A sneak peek and one of my beloved bunnies

The Birthday Girl
and her big sister
Don't you just love these Pink Poppy dresses.

Love Jade xx


19 March 2013

Easter Basket Cupcakes

You may have noticed I haven't posted for quite some time. The reason amongst others is that I have been baking up a storm for various events. This time of year is absolutely crazy for my family and I every year (particularly me, I say yes too often) ....bring on April.

Yesterday I was busy in my kitchen baking and decorating for the P&Cs Easter Baking Fundraiser.
I am so glad that all my baking commitments are over for the time being because I was having a terrible baking day yesterday. The join on the seal of my oven had failed so part of the seal was hanging out the bottom of my oven door and my poor little cupcakes were coming out all wonky, despite my vigilant tray turning. Of all the batches I did only 4 cupcakes came out perfect, it just wasn't my day.
But I soldiered on and made the best of what I had because after all it was to raise money for my girls school, and I figured that the kids wouldn't care whether they were perfect or not.
To my surprise however once decorated they looked fine, not what I imagined but that's the perfectionist coming out in me.

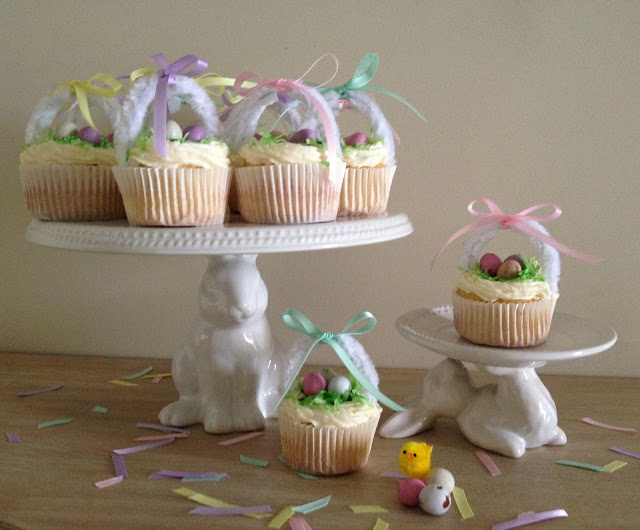
Here is the end result... but I really do think that its the presentation on my gorgeous, all the way from the States, cost me an arm and a leg in shipping charges, Pottery Barn Bunny cake plates.


Ingredients 

Vanilla Buttercake
 90g butter, softened
 1 tsp vanilla extract
 2 eggs
 1/2 cup caster sugar
 1 cup SR flour
 2 tbs milk

Buttercream frosting
 125g butter, softened
 2 cups pure icing sugar
 3 tbs milk
 1/4 tsp peppermint extract, or to taste
 green food colouring 

Decorations
 1/2 cup shredded coconut
 green food colouring
 Cadbury mini candy covered eggs
 Pipe cleaners to match your paper cupcake cases, cut in half then twisted around each other and bent      into a 'U' shape
 Pastel thin ribbon

1. Preheat the oven to 180*C/ 160*C fan-forced. Line a standard tray with your paper cases.
2. Beat butter, extract, eggs, sugar, flour and milk with an electric mixer until combined. Increase mixer speed until cake mixture is changed to a paler colour.
3. Divide the mixture amongst the cases , smoothing the surface.
4. Bake your cakes for 20mins. Time will vary depending on your oven. turn out onto a wire rack to cool.

Now its time to make your icing

5. Beat butter with an electric mixer until, light and fluffy, beat in sifted icing sugar and milk in batches.
Remove approximately 1/2 cup of the frosting and place in a small bowl, to this add your peppermint extract, and green food colouring and mix until you have achieved your desired colour. Place the rest of your frosting into your piping bag.
6. In a small bowl, using your fingertips rub the green food colouring into the Shredded Coconut until you are satisfied with the colour dispersion.

Woohoo time to decorate

7. Using a serrated knife cut out a little hole from the top of each cake.


8. Fill the holes with your green peppermint frosting.


9. Next you are going to make the top edge of your Easter basket by piping around the outside of your peppermint filling.


10. Time to add the faux grass clippings, sprinkle the coloured shredded coconut on the inside edge of your piping, you need to leave some peppermint icing visible so that the candy eggs have something to adhere to.


11. Place 3 candy eggs into the centre of each cupcake.


12. Now we can add the finishing pieces, press each side of your 'U' shaped pipe cleaner handles into opposite sides of the cupcake and tie a ribbon to the top of your basket handle.

Aww so sweet
These would look gorgeous in some beautiful pastel cupcake wrappers with corresponding coloured pipe cleaners and icing if you were making them for a special occasion. I saw some gorgeous cut out filigree wraps that would make beautiful baskets, but for this particular event plain white paper cases were just fine.

Cute and easy (and they sold out in a flash I'm happy to report)

Happy Easter 

Love Jade xx


Just a couple more pics of those adorable Bunny Plates...


Sorry I can't help myself, I love my bunnies. Hurry up Pottery Barn Australia, postage is killing me. Hopefully the next one will be up here in QLD, highly unlikely... but I'm still keeping my fingers... and toes crossed.


26 February 2013

Contrast Piping

I am coveting a new sofa like this one I found on www.houzz.com

Image from houzz.com

Remember how I told you I get 'Obsessions', well Contrast Piping is one of those obsessions right now. I love the way it brings a degree of sophistication to whichever piece it may be, whether it's a sofa, headboard or cushions. 

I was wandering through Oz Design Furniture, coffee in hand, one day late last year when I came across the most delicious sofa with contrast piping. I instantly fell in love and decided that I realllllly needed a new sofa. Unfortunately my husband doesn't agree with me...yet. 
The Milson sofa from Oz Design Furniture

Of course my little 'Contrast Piping Obsession' has me designing away feverishly in my head, keeping me awake at night dreaming about other less costly ways I can bring contrast piping into my home. IF I am unable to bring my husband around to the new sofa that is.
So to temporarily satisfy my Contrast piping desires I hit the shops and the net. 

Here are some of my finds...


Loving the hot pink dining chairs and the double row of orange piping on the headboard.
Now to try and make a decision. Hmmm...

Love Jade xx

Ooooh.... Check it out, I spotted the judges from The Block sitting on a sofa with orange contrast piping, guess I'm not the only one with this love affair at the moment.

Judges Neale, Shaynna and Darren from The Block

PS Sorry about the terrible pic, I had to use my phone to get it 


13 February 2013

Valentines Day Lollipop Cards

Kids just love any celebration there is, especially when it involves chocolates and candy.
Little girls especially love Valentines Day.
Hearts, candy, chocolates, colours of pink and red, flowers and things that sparkle, it's just about every little girls dream day, throw in a tiara and some fairy wings and it certainly will be.
So this year I decided to indulge in my girls desire to give Valentines to their friends, with this very easy little project.

Valentines Day Lollipop cards

You will need

   Cardboard, any colour you wish of course my girls chose pink
   Heart shaped template, You can just draw a heart on a piece of card and cut it out for the kids to trace around
   Markers
   Glue
   Glitter, confetti, stamps, stickers etc...
   Lollipops, enough for the list of Valentines your child/ren has
   Sticky tape
   Ribbon

1.  Using the heart shaped template, trace around then cut out enough hearts for each of your Valentines
2.  Write your special message to your Valentine on the card heart
3.  Decorate your heart with glitter and whatever else your little heart desires, allow to dry
4.  Once dried, flip the card over and stick a lollipop to the back with sticky tape, making sure the lollipop stick sticks out below the point on the bottom of the heart
5.  Tie a ribbon on the lollipop stick at the base of the cardboard heart

Getting creative

A very PINK day as you can see

As with most children my girls love getting crafty, particularly if it involves excessive amounts of glitter (which I'm now finding absolutely everywhere) and they can't wait to give out their little masterpieces this Valentines Day.


Love Jade Xx